Issue description –
Network connectivity doesn’t work with Windows 2003 VMs in Azure
In some cases, you may observe network connectivity issue with Windows Server 2003 virtual machine in Azure after migration from on-premises VMWare infrastructure.
Symptoms –
1. You are not able to ping, RDP or telnet on any port to the migrated virtual machine within /or across subnet.
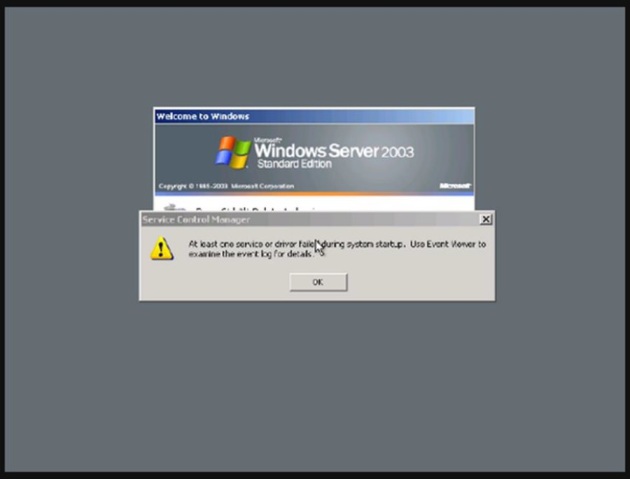
2. You will see ‘Welcome to Windows’ screen in the ‘Boot diagnostics’ feature in Azure platform. (Note: You may get ‘Service control Manager’ screen as well.)
Cause – This issue occurs as Hyper-V integration services were not installed on the VM before migration.
Resolution – The following methods will help to resolve the network connectivity issue in Azure with Windows Server 2003 after migration activity.
Method 1: – Use GP Settings to install Hyper-V Integration Services during Startup operation.
Pre-requisites to resolve network connectivity issue using Method 1:
1. Windows 2012/2012 R2 Hyper-V Guest integration services – Download Windows server 2012R2/2012 Hyper-V Guest integration services from this link . OR If you have a Hyper-V 2012 environment you can get the installer from C:\Windows\System32\vmguest.iso. Mount the iso file and copy the installer folder to the Windows Server 2003 VM to be migrated.
Resolution Steps:
1. Login to Windows Server 2003 VM with administrator credentials (i.e. to be migrated VM in your VMWare environment)
2. Copy Hyper-V Guest integration services installer under C:\HyperV folder.
3. Below are details to create GP settings:
– Run -> gpedit.msc
– “Computer Configuration” -> “Windows Settings” -> “Scripts (Startup/Shutdown)”
– Open Startup -> Add -> select setup.exe from C:\HyperV folder in the “Script Name”

Note: You won’t be able to install guest integration services directly on the virtual machine that is running on VMware farm.
4. The above Startup task will install the Hyper-V Guest components on the first boot in Azure. If required, reboot VM twice to ensure integration services comes in effect on the virtual machine.
Method 2: – Install Hyper-V Integration Services manually on Windows Server 2003 using Windows 2016 Hyper-V Host in Azure.
In certain cases, GP settings Startup task may not work on the migrated VM. If that happens, then you can follow steps listed under Method 2 to install Hyper-V integration services manually on Windows Server 2003.
Pre-requisites to resolve network connectivity issue using Method 2:
1. Windows 2012/2012 R2 Hyper-V Guest integration services – Download Windows server 2012R2/2012 Hyper-V Guest integration services from this link . OR If you have a Hyper-V 2012 environment you can get the installer from C:\Windows\System32\vmguest.iso. Mount the iso file and copy the installer folder to the Windows Server 2003 VM to be migrated.
2. Create Windows 2016 Hyper-V virtual machine in Azure (Reference article: https://docs.microsoft.com/en-us/azure/virtual-machines/windows/nested-virtualization).
3. Local Admin credentials of migrated Windows Server 2003
Resolution Steps:
1. Migrate Windows Server 2003 VM from VMWare on-premise environment to Azure using Azure Migrate tool.
2. Download OS disk of migrated Windows Server 2003 VM to HyperV Host server under C:\Win2003 folder
– Login to Azure Portal → Deallocated Windows 2003 VM → Locate the attached OS disk in the portal and Select ‘Disk Export’ option -> Click ‘Generate URL’ to download VHD file from Azure Subscription to Hyper-V host (Server Name: W2k16HyperV).

– Copy URL to download the VHD file to Hyper-V Host (Server Name: W2k16HyperV)

– Login to W2k16HyperV server – Open Internet Explorer – Type the URL in the address bar that you had copied in the previous step to download the VHD file (OS disk) of Win 2003 VM and save that file under C:\Win2003 folder.
Note: Ensure that the downloaded file extension is ‘.vhd’. If required, you can change the file extension to .vhd after the download process has been completed.
3. Create a New VM in Hyper-V Manager using downloaded Win 2003 OS VHD
– Open Hyper-V Manager on W2k16HyperV server and create a New VM by selecting boot disk (C drive) that you’ve download in the Step 2.
– Power-on / Start VM in Hyper-V Manager.
Note: This New VM, i.e. Win2003 VM may not detect your mouse in the remote session, so you’ll have to use keyboard.
Reference article: https://docs.microsoft.com/en-us/windows-server/virtualization/hyper-v/get-started/create-a-virtual-machine-in-hyper-v
4. Login to this Win2003 VM with local admin credentials and install HyperV integration services from C:\HyperV folder – Run Setup.exe file.
Note: This New VM, i.e. Win2003 VM may not detect your mouse in the remote session, so you’ll have to use keyboard.
– Reboot Win2003 VM after installation process has been completed.
– Login to Win2003 server -> Open cmd -> Run “Ipconfig” command and confirm that result contain 169.254.x.x. IP address. (Note: Your mouse should work after installing HyperV integration services)
– Shutdown/Power-off VM if you can see 169.254.x.x as a result of ipconfig command.
5. Open Powershell -> Login to Azure using your credentials
– Ensure you’re connected to the right subscription by using Set-Azcontext command
– Next step is, to upload Win2003 OS disk wherein you’ve successfully installed Hyper-V integration services in Step 4.
Note: If necessary, change required variables / parameters in below commands to match with folder name, RG name and disk name etc.
————————————————————–
$VHDlocation = ‘C:\Win2003\Win2k3.vhd’ $DiskName = ‘Win2003-test_01’ $sku = Standard_LRS $RSGName = ‘rsgauewin2k301’ $vhdSizeBytes = (Get-Item $VHDlocation).length $diskconfig = New-AzDiskConfig -SkuName $sku -OsType ‘Windows’ -UploadSizeInBytes $vhdSizeBytes -Location ‘australiaeast’ -CreateOption ‘Upload’ New-AzDisk -ResourceGroupName $RSGName -DiskName $DiskName -Disk $diskconfig $diskSas = Grant-AzDiskAccess -ResourceGroupName $RSGName -DiskName $DiskName -DurationInSecond 86400 -Access ‘Write’ $disk = Get-AzDisk -ResourceGroupName $RSGName -DiskName $DiskName
————————————————————–
– If there are no errors observed while executing above commands, then upload Win2003 OS disk by using AzCopy command. Reference article: https://docs.microsoft.com/en-us/azure/storage/common/storage-use-azcopy-v10
AzCopy.exe copy “C:\Win2003\Win2k3.vhd” $diskSas.AccessSAS –blob-type PageBlob
6. Login to Azure Portal with your credential. Locate the disk (Powershell script had disk name variable) that you’ve uploaded in the subscription in the previous ‘Step 5’.
– Select the uploaded Win2003 OS disk – click on ‘Create VM’ and follow the wizard to provision VM.
– Ensure you attach all data disks that you’ve migrated for the respective VM while creating the new VM.

– Power-on this VM and validate networking connectivity to/from within subnet and across subnet.
